
Shore hardness is one of the basic indicators used to quickly evaluate the mechanical and physical properties of rubber in manufacturing and quality control. At Thai Duong Plastics, hardness control is always carried out according to a standardized procedure to ensure product consistency and reliability. The article below summarizes the principles, procedures, and applicable standards used when measuring the Shore hardness of rubber in real production environments.
What is Shore hardness?
Shore hardness, also known as durometer hardness, is the degree to which a material resists indentation deformation when a standardized indenter tip is pressed into the sample surface under the spring force of the measuring device. The Shore scale ranges from 0 to 100 and has no unit. In technical reports, the value is recorded together with the scale designation for identification (for example: 70 Shore A). In general, a higher value indicates that the material is more difficult to indent under the test conditions.
An important point with rubber is its viscoelastic behavior. For the same sample, the reading can change depending on the dwell time under load. Therefore, standards may permit or require a specified reading time, and the report should clearly state the exact time at which the value was read.
Choosing Shore A/D/AO/AM scales
To obtain good resolution and avoid misleading results, you need to choose the correct scale from the beginning. Below is the common practice used in rubber factories and under international standards:
- Shore A: Used for soft to medium rubber and common elastomers such as NR, SBR, NBR, EPDM, silicone, TPE, etc., within the usual hardness range.
- Shore D: Used for harder materials such as hard rubber, rigid thermoplastics, rigid PU, etc. The D scale is appropriate when the material exceeds the optimal measuring range of Shore A.
- Shore AO: Used for very soft rubber and some cellular materials. This scale gives more stable results with very soft materials, because if Shore A is used, the indenter may penetrate too deeply and distort the reading.
- Shore AM: Used for small or thin test specimens (typically from 1.5 mm to 2.0 mm) that still fall within the hardness range of Shore A. This is a practical option when it is not possible to prepare a specimen thick enough for the standard Shore A method.
Scale-switching rules to apply in QC
To avoid edge-range measurements that are difficult to compare, you can apply the following practical rules and clearly state the scale used in the report:
- When Shore A readings are consistently high, approaching 90 or above, consider switching to Shore D to improve resolution in the higher-hardness range.
- When Shore D readings are low, near 20 or below, consider switching to Shore A.
- When the specimen is thinner than the minimum thickness required for the standard Shore A method, prioritize Shore AM instead of forcing Shore A and accepting error.
- When the material is extremely soft, shows unusually deep indenter penetration, and gives poor repeatability, consider using Shore AO.
In production, a common question is whether Shore A and Shore D can be directly converted. The answer is that they should not be treated as a linear conversion. The two scales use different indenters and forces, have only limited overlap, and have different sensitivities. Therefore, it is best to choose the appropriate scale and keep it consistent in the product’s internal standard.
Standards applied to rubber hardness measurement
For the measurement result to be valid for acceptance and comparison between parties, the test must be performed and reported according to a specific standard. Clearly stating the standard ensures consistency in the method, test conditions, and reading procedure. In the rubber industry, the most commonly used standards include:
- ISO 48-4 (formerly ISO 7619-1) or TCVN 1595-1: These are the core standards specifying the durometer method for determining indentation hardness (Shore hardness) of vulcanized or thermoplastic rubber.
- ASTM D2240 issued by ASTM International: Widely used in international trade, this standard specifies the device configuration and the procedure for reading hardness values in detail.
In some cases, ISO 48 from the International Organization for Standardization may also be referenced for the IRHD method. IRHD also measures indentation hardness, but it uses a different loading configuration and value determination method, so it is not a direct substitute for Shore hardness.
Procedure for measuring Shore hardness of rubber
Below is a standardized Shore hardness measurement procedure suitable for production and QC environments. When the steps are performed consistently, the results will have good repeatability, long-term stability, and comparability between production shifts:
Stage 1: Specimen preparation
Before taking the measurement, make sure the specimen meets the following basic conditions:
- Measurement surface
The surface must be flat, clean, free of oil or grease, free of flash, and without dents or large ribs at the test point. For molded parts with a parting line, avoid measuring close to the parting line because surface irregularity can introduce error.
- Thickness and support surface
The specimen must be thick enough so that the indenter is not affected by the support underneath. If the specimen is too thin, the reading may be falsely high or falsely low depending on the setup, and repeatability will be poor. When the standard thickness cannot be achieved, Shore AM should be preferred. If specimens must be stacked to reach the required thickness, the contact surfaces must be extremely flat, clean, and free from trapped air to reduce error compared with a solid specimen.
- Conditioning
Rubber is sensitive to temperature and recovery time after deformation. The specimen should be conditioned at laboratory conditions for an appropriate period according to the internal procedure or referenced standard, especially if it has just been molded, cured, surface-ground, or removed from a hot or cold environment.
In rubber processing, a common situation is measuring immediately after molding or after oven drying. This can cause significant variation between measurements because the material has not yet reached a stable state. The solution is to standardize the waiting time and measurement temperature in the internal standard.
Stage 2: Equipment preparation
The device must be checked and prepared correctly before measurement, because this directly affects stability and repeatability of the result:
- Select the correct durometer type: Confirm that the A, D, AO, or AM scale matches the expected hardness range.
- Check the mechanical condition: Make sure the indenter tip is not worn, the presser foot is flat and clean, the spring operates smoothly, and the pointer or digital display is stable.
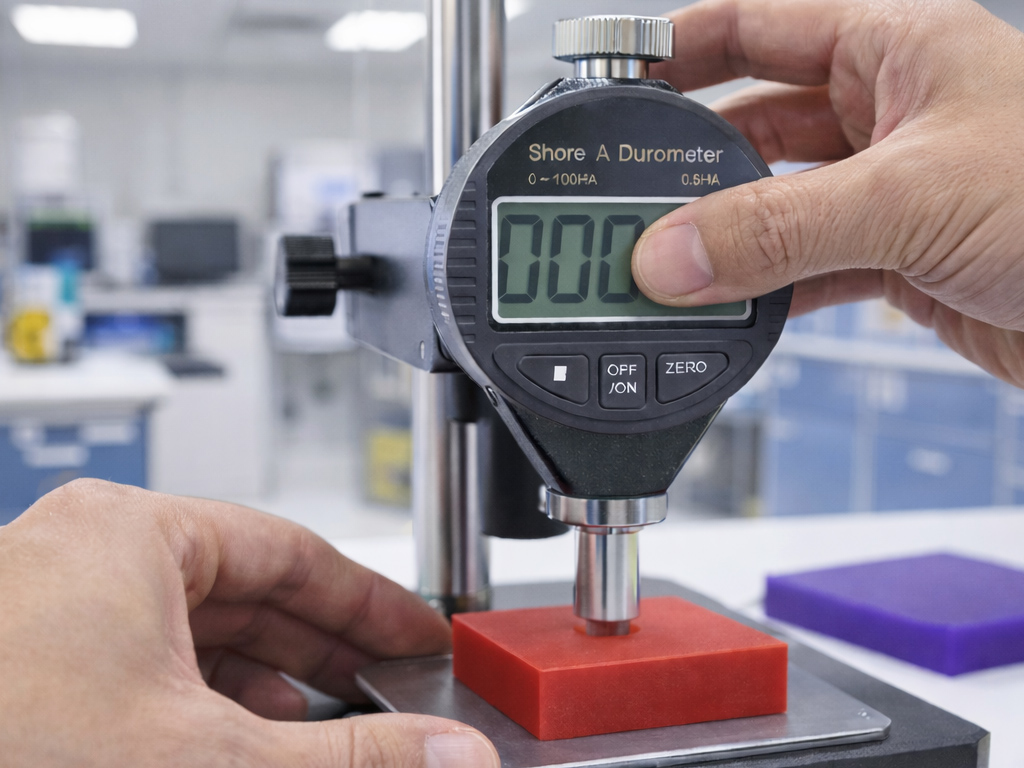
- Calibration and quick verification: Perform checks according to the QC room’s calibration schedule or the requirements of the applicable standard. In daily operation, a quick check using a reference block is recommended if the unit has one available.
- Use a test stand when higher stability is required: If the product requires tight error control or if there is a dispute over the data, a stand should be used to control the applied force and perpendicularity. Handheld measurement depends heavily on operator technique, especially with soft materials.
Stage 3: Measurement steps and reading method
Below is the recommended sequence consistent with QC practice and aligned with standard test principles:
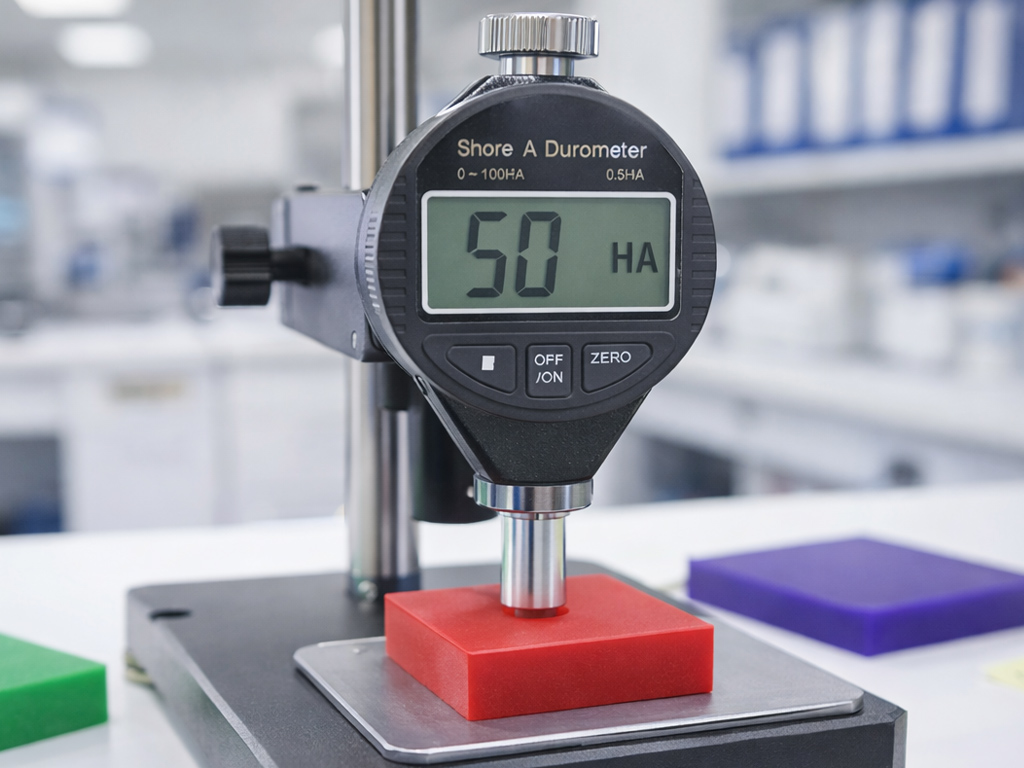
- Step 1: Place the specimen
Place the specimen on a hard, clean, vibration-free flat surface. Do not place it on soft materials such as rubber, soft wood, or foam.
- Step 2: Position the device perpendicular to the surface
Place the durometer so that the indenter is perpendicular to the specimen surface and the presser foot makes even contact.
- Step 3: Apply force steadily
Lower the device onto the surface at a steady rate. Avoid jerking or pressing too hard. Once the presser foot is fully seated, hold it stable.
- Step 4: Read the result at the specified time
This is the key technical point that many units overlook, leading to discrepancies between parties. Due to its viscoelastic nature, rubber shows delayed deformation and stress relaxation immediately after the indenter contacts the surface. As a result, the value shown on the dial often decreases over the holding time. To ensure the result is comparable, you must follow these rules:
- Standardize the reading time: Depending on the standard used, the reading may be taken immediately, after 1 second under ASTM D2240, or after 3 seconds or 15 seconds under ISO 48-4. Only one time point should be used consistently for the entire lot.
- Special materials: For thermoplastic rubber or special technical requirements, the dwell time may be longer to allow the value to stabilize. This time point must be clearly stated in the report.
Why can the reading at the same point differ between the instant of contact and a few seconds later? This is a natural property of rubber, not a device defect. The only way to handle it is to standardize the reading time in the quality-control procedure to ensure objective comparison of results.
Stage 4: Number of test points and result processing
To ensure the result properly reflects the characteristics of the rubber part, especially for products with non-uniform hardness or varying thickness, the number of measurement points per specimen should be clearly defined:
- Number of test points
At least 5 points per specimen or part are recommended, distributed evenly across a sufficiently large flat area. For a standard sheet specimen, the number of points may be increased if uniformity assessment is required.
- Distance between test points
Each point must be spaced far enough apart so that it is not affected by the previous indentation. If measurements are taken too close together, the result may be distorted because the material has not fully recovered.
- Data processing
- Record every individual reading.
- Calculate the average value.
- Depending on QC requirements, also record minimum, maximum, and deviation values.
If there is an abnormal outlier, it should not be discarded arbitrarily unless a rule exists. Check possible causes such as a curved surface, flash, entrapped air, under-cured area, or improper placement. Then repeat the test at a valid location.
How to write a Shore hardness test report for rubber
After completing the test, the result should be documented according to the correct structure and applicable standard. A Shore hardness report should include the following:
- Referenced standard: TCVN 1595-1, ISO 7619-1, ASTM D2240.
- Scale type: Shore A, Shore D, Shore AO, Shore AM.
- Reading time: For example, read at 3 seconds or read at 15 seconds.
- Environmental conditions: Temperature and humidity, if required.
- Specimen information: Material, batch code, surface condition, thickness, and specimen preparation method.
- Equipment: Device ID, calibration status, and whether a test stand was used.
- Results: Each reading point, average value, and acceptance criteria.
Short QC reporting formats commonly used:
- 65 Shore A, read at 3 seconds, n = 5, 23°C.
- 38 Shore D, read at 1 second, n = 5, 23°C.
Common errors and corrective actions
During measurement, a number of errors may occur that affect accuracy. Below are common issues and how to address them:
Specimen too thin or unsuitable support surface
- Signs: Large variation in readings, strong variation by position, or a result that deviates from batch history.
- Corrective action: Use a specimen thick enough, stack layers if permitted by the procedure, or switch to Shore AM for thin specimens.
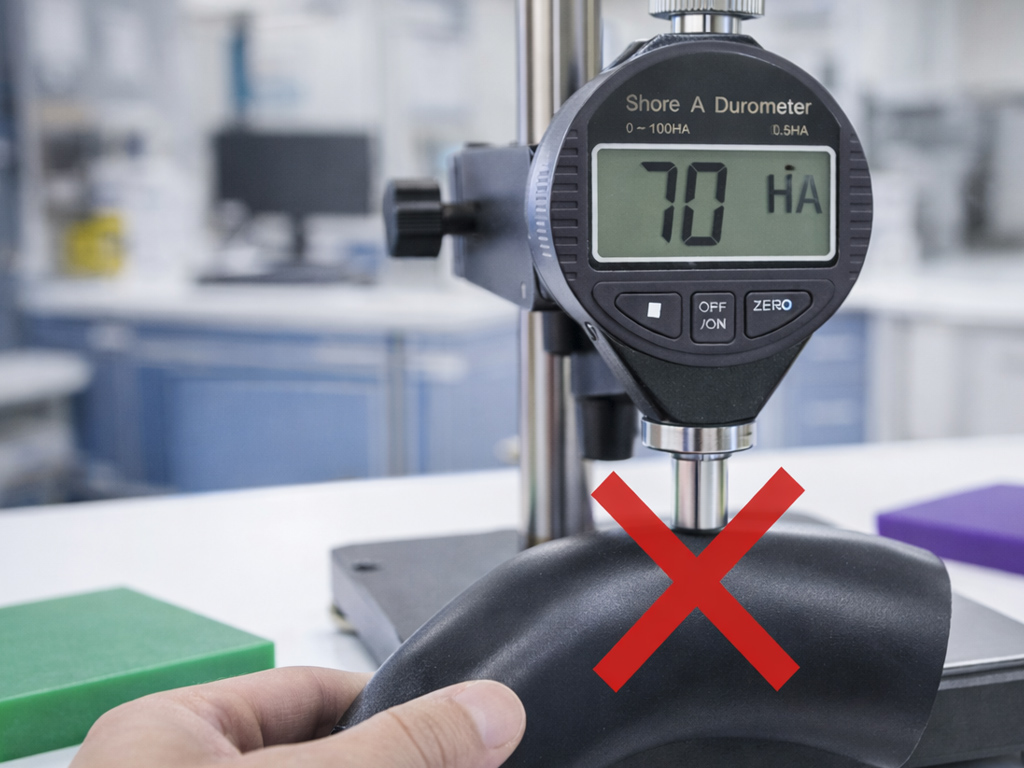
Measuring on a curved or uneven surface
- Signs: Unstable readings, often tending falsely low because the presser foot does not seat evenly.
- Corrective action: Select a flat area, prepare the surface properly, or produce a flat test piece from the same material. If measurement on a curved part is unavoidable, clearly state the limitation and use an appropriate fixture according to the relevant standard.
Failure to control reading time
- Signs: Different operators obtain different values from the same specimen.
- Corrective action: Clearly define the reading time in the standard operating procedure, use a stopwatch, or use a device with timed value-hold so everyone reads at the same time point.
Unstable handheld operation
- Signs: Poor repeatability between shifts or between operators.
- Corrective action: Train operators to place the device vertically, use a stand for important products, and control the application speed.
Measurement points too close together
- Signs: Subsequent readings tend to be abnormally low or high because the material has not recovered.
- Corrective action: Increase spacing between points, follow a fixed measurement pattern, and avoid testing directly on a previous indentation mark.
Shore hardness is an important indicator in rubber quality control, but it only becomes truly meaningful when it is measured using the correct method and under a clearly defined standard. Standardizing both the measurement procedure and the reporting format helps manufacturers maintain product consistency, reduce lot-to-lot variation, and improve reliability when working with customers.
Reference: Industrial Rubber Molding Solutions to Technical Requirements